
|

|
| Choosing a Bike | Equipment | Clothing | Nutrition | Position | Riding Advice | Glossary of Terms |
|---|
Firstly you must decide what type of riding you are going to do. Will it be on the roads or off-road? Will it be for racing, touring, or commuting? If it is for racing, what kind of racing will you be doing - road racing, track racing, time trialling or mountain bike racing?
90% of the mountain bikes sold in this country are never ridden off road. Most are used for commuting or just sit in the shed. If you are going to use it regularly off road then there is nothing better than a mountain bike for this purpose, however they are heavy and unresponsive when used on the roads. If you only want the one bike but you also wish to commute, then a second pair of tyres with a narrow, slick tread can make a big difference to the performance of the bike. You may even consider having a second set of wheels built especially for this purpose. These tyres give the added benefit of better handling and grip than knobbly mountain bike tyres on wet tarmac.
Do you intend to race, commute, tour, or a mixture. A good compromise for all three is to purchase a winter training bike. This will be reasonably light and responsive, have narrow wheels and room for mudguards, The advantage with this type of bike is that the mudguards can be removed and narrower tyres fitted for racing without sacrificing too much performance in comparison to a purpose built racing machine. Alternatively carriers for saddle bags and panniers can usually be added and the gears adjusted for touring.
Purpose built touring bikes will tend to have larger clearance for mudguards and larger tyres, a wider range of gears, and the carriers already fitted; whereas racing bikes will have narrower tyres, higher gears and close clearances.
If you intend to race but are not sure what kind as yet, a road racing bike is a good first option as tri-bars can be added for time trials or triathlons, and then removed for road races (as you are not allowed to use them in bunched races).
Most bikes bought by novice cyclists are already built up with all its components, however you may wish to go for a custom built bike. Buying off the peg is usually cheaper than buying a frame and components individually, however there are often some cost saving items the manufacturer has included that may have to be replaced within a short time. A custom built machine gives you the opportunity of having exactly what you want.
Go to a reputable dealer and get advice. If you are unsure about what to buy, ask someone in the club to come along with you.
The frame is the heart of a good bike. Look for a bike with a good frame, even if the rest of the equipment is not as good. Remember that the components can always be upgraded at a later date.
This used to be the most common material for a frame however this has mostly been replaced by alloy or carbon fibre. If you are choosing steel, look for a frame that is made from a steel alloy such as Chrome Molybdenum (CroMo) or Manganese Molybdeneum (MangMoly). Most of the frames you should be looking at will say which company manufactured the frame tubes (as opposed to who constructed the frame). Names to look out for include Reynolds, Columbus, Dedeccai, Vitus, Oria and Tange.
Alternatively you can go to a specialist
frame builder who will build one up to fit your measurements and specifications. There are few frame builders who have the technology to build in anything other than steel or aluminium.
Steel has the advantage of being sturdy, responsive yet forgiving on rough roads, can be repaired by a frame builder quite easily in the event of accidents, and probably represents the best value. Additionally some of the latest top end steel road frames are nearly as light as aluminium.
Aluminium frames are now the most common. They can be lighter than steel but are usually more expensive. They can also be made stiffer than steel through the use of larger diameter frame tubes (which increases the fatigue life compared to narrow aluminium tubes) but this can make for a harsh ride on rough roads or tracks. They will require specialist knowledge to repair them however. Most better quality aluminium frames now include carbon fibre front forks and some include carbon seat and/or chain stays.
These can be made either from either tubes or a monocoque (e.g. moulded like Chris Boardman's 'Lotus'). They can be very light but are also expensive - although prices are coming down now that they becoming more common. They tend to be reserved for top of the range bikes.
Titanium is expensive and difficult to work with but is also very light and stronger than aluminium. It also has a natural spring that makes it more forgiving than aluminium. Again these frames tend to be for top end racing bikes.
Having the correct size of frame makes for a good
position on the bike, and therefore a more comfortable ride.
Frame sizes can be specified in either inches or centimetres. If the frame size is in inches, then this is usually the measurement from the centre of the bottom bracket to the top of the seat tube (or 'centre to top'). Continental frame sizes are given in centimetres and are usually measured from the centre of the bottom bracket to a point in line with the centre of the top tube (or cross bar) ('centre to centre'). However to complicate matters, some British frames are also measured in centimetres but from centre to top! A further complication is that a lot of frames now have sloping top tubes. The measurements of these frames are unsually based on a 'virtual' horizontal top tube rather than the actual sloping top tube. It is always worth checking how the frame is measured before buying or ordering.
The top tube length is always centre to centre (i.e. centre of the seat tube to centre of the head tube) - except for those frames with sloping top tubes (see above).
The following table gives a rough guide to the size of road frame you should buy.
| Inside leg is measured from crotch to the ground | |||||
| These sizes are APPROXIMATE only. | |||||
| Inside Leg | Seat Tube | Top Tube | |||
| Inches | cm | Inches | cm | Inches | cm |
| (C to T) | (C to C) | (C to C) | (C to C) | ||
| 29 | 73.5 | 19.0 | 47.0 | 19.0 | 48.5 |
| 30 | 76.0 | 20.0 | 49.5 | 20.0 | 51.0 |
| 31 | 78.5 | 21.0 | 52.0 | 20.5 | 52.0 |
| 32 | 81.5 | 22.0 | 54.5 | 21.0 | 53.5 |
| 33 | 84.0 | 23.0 | 57.0 | 22.0 | 56.0 |
| 34 | 86.5 | 23.5 | 58.5 | 22.5 | 57.0 |
| 35 | 89.0 | 24.5 | 61.0 | 23.0 | 58.5 |
| 36 | 91.5 | 25.0 | 62.5 | 23.5 | 59.5 |
| 37 | 94.0 | 25.5 | 63.5 | 24.0 | 61.0 |
| 38 | 96.5 | 26.0 | 64.5 | 24.5 | 62.0 |
However these sizes are only a guide and as everyone is different then you may need to adapt accordingly, either by having a frame custom built or by varying saddle position and handlebar extension length.
With mountain bike frames however, sizing is more difficult and will depend more on rider 'feel' than any hard and fast rules. The length of the top tube is more critical than the seat tube length (as mountain bike seat pillars are longer and therefore have more adjustment). The longer the top tube, the more stretched out you will be on the bike. Novice riders tend to prefer to be more upright and so will require a shorter top tube whereas a racing mountain bike's will be longer. Also look for a frame that will give you at least 2 inches clearance between crotch and top tube when standing astride the bike.
Alternatively you may wish to have a computer program calculate the size of frame for you. Certain cycle shops operate the Bioracer computer system (http://www.bioracer.com) for example. The shop assistant will take certain critical measurements from you (e.g. height, leg length, etc.) and send them to Bioracer. The Bioracer computer program will then calculate all the dimensions of the bike (seat tube, top tube etc. ) right down to the crank length, and saddle height, depending on the type of riding the bike is designed for. This is good way of avoiding any trial and error in setting up the bike although you will pay a fee for this.
Do not worry if you think your bike is not good enough. As long as it is mechanically sound and is the correct size, then it does not matter what bike you ride. Remember bikes can be upgraded or changed at a later date.
The following section will give you a guide as to what equipment is necessary or advisable to have and to give a rough guide on what to look for when buying a bike.
These are a MUST when riding after dark. The range of lights available now is bewildering and you should think carefully about what kind of riding you will be doing before choosing a light.
Firstly consider where you will be riding, i.e. in town where there are street lights where the main purpose of the lights will be to be seen; or around unlit lanes where the primary purpose is to see where you are going.
Secondly consider how long your regular journey is.
Lastly consider whether you want them to be removable or permanently attached to your bike.
If you are cycling on street lit roads, the main purpose of your lights is to be seen and so it is probably not necessary to have a very bright beam (say a 2.5 watt bulb). For unlit roads where you need to see, a lamp with a 6w bulb should be sufficient to avoid those pot holes. You can buy lamps with much higher wattages (say 10 or even 20w) but bear in mind that the higher the output, the shorter the battery life. The very high power systems are good for off road riding at night but can be impractical for commuting due to their shorter burn time. Many of the newer systems are rechargeable or have separate battery packs. Alternatively many of the newer LED front lights now give enough light to see with and are road legal - and have the added advantage of very long battery life compared with traditional bulbs.
It is illegal to cycle at night without a BSI approved lamp and there are many rear lights that do not currently have the kitemark. This includes a lot of the LED lamps available now, however they can act as a good backup to your main lamp and have a very long battery life.
The equipment listed above are the essential extras you will need. In the following section, we will describe the bikes and the actual componentry.
This is essential when you go out for ride as you may have a long walk home if you happen to puncture.
As a minimum take at least one spare inner tube and tyre levers with you. Ideally two would be better plus patches and glue to repair the tube if necessary. A small square of thick cloth or canvas (or a piece of an old tyre) is useful if the tyre gets split or damaged. Changing the tube instead of repairing it saves time and helps prevent you getting chilled when stopped. A rag or rubber surgical gloves are also useful as you are more likely to puncture when the roads are at their dirtiest. This will save getting your hands and therefore the inside of your gloves from getting dirty
Assuming that your bike is well maintained then you should not need to take many tools with you when cycling on the road. When mountain biking however, mishaps do occur and a few well chosen tools can get you out of tricky situations, e.g:-
A Spoke key for trueing a buckled wheel.
4,5,6mm Allen keys, and an 8mm if your chainset has a 'one key release' mechanism.
A small adjustable spanner
A chain link remover for splitting a chain.
When maintaining your bike, having the correct tools for the job makes life infinitely easier and you should aim to build up your tool set gradually. Remember that other members of the club will probably have tools you can borrow.
Most systems nowadays are Indexed or 'click shift' gears. One click of the gear lever will change the gear by one sprocket. The two main systems of indexing are manufactured by Shimano and Campagnolo (Campag for short) and each have two different types of gear lever. Neither system is totally compatible with the other and so having decided on one system, you should try to keep that system on all your future bikes to ensure compatibility. The original gear levers were called either SIS (Shimano Index System) or Syncro (Campag) and were available for either road bikes or mountain bikes. Since then the trend has been to produce combined gear and brake levers. Shimano were the first with their STI (Shimano Total Integration) followed by Campag's Ergopower (Ergo for short). Shimano produce road and mountain bike versions whereas Campag tend to stick to the road.
American company SRAM - famous for their twist grip systems on mountain bikes - have also branched out into the road market in recent years and produced groupsets comparable in price and functionality with Shimano and Campag. Their gear systems tend to be compatible with the equivalent Shimano offerings as the sprocket spacing is the same - the main difference is their "Double Tap" gear/brake levers work differently.
In recent years the number of gears available has been increasing with manufacturers now producing gear sets with 8, 9, 10 or even 11 sprockets on the back wheel. Our advice is to choose 9, 10 or 11 speed as the older 7 and 8 speed systems gradually become obsolete.
The latest trend is for the gears to become electric. Apart from the Mavic 'Mektronic' system from the 90's (no longer produced), these electronic systems are still in development and mainly used by the professional racing teams. Expect them to filter down to the general consumer market in the next year of so however.
When buying road handlebars, choose a pair that are the same width as your shoulders. Many mass produced bikes have handlebars that too narrow and a handlebar stem that is too short and you will end up feeling cramped. Ask the cycle shop if they will change them if they are not the correct size. Remember, the taller you are, the longer the handlebar stem you will need.
If you are buying a complete bike, check the wheels are true and round. If they are not, ask the cycle shop to do this before taking
delivery. The spokes should be tight and of an even tension all the way round.
For general road riding, we would recommend a wheel with a 700c HP (high pressure) rim with either 32 or 36 spokes (36 for the heavier rider). This type of rim uses a tyre that has a separate inner tube and comes in many widths and tread patterns, some of which will be suitable for racing, some for training, and some for touring.
For racing you may consider a sprint rim where the tubular tyre is actually glued to the rim. These are not particularly suitable for general riding however as you will need to carry spare 'tubs' (tubular tyres) with you and care needs to be taken after a tub has been changed until it has been re-glued.
Many specialist cycle shops will build up wheels to your specification and will generally be of a higher standard than those supplied with cheaper mass produced bikes, although you will pay more for them.
The other trend in recent years is for good quality 'factory built' wheels. These tend to have a deeper rim than normal (in either aliminium or carbon fibre) with an 'aero' section which allow the wheel to be built with fewer spokes (say 12-24). These tended to be used for racing rather than general riding, however there are a number of budget wheelsets now available with low spoke counts that could be used for general riding or racing.
For general riding and training, choose a high pressure (or clincher) tyre with a width of about 23-25mm, for racing say 19-22mm and for touring 28-35mm. Many tyres are available with a puncture resistant (kevlar) belt, although they tend to be a little bit more sluggish than those without. We would suggest these for training and touring.
You can also get specialist racing tyres called tubular tyres ('tubs' for short) where the inner tube is actually sewn into the outer casing and the tyre is glued to the rim, but these need specific 'sprint' wheels.
Butyl (a synthetic rubber) inner tubes are a little heavier than pure latex tubes but retain their pressure for much longer.
When fitting high pressure tyres, a little talcum powder spread around the inside makes the tyre easier to fit and stops the inner tube from sticking to the tyre.
Avoid using tyre levers when fitting tyres as they can pinch the inner tube - unless they are specifically designed for the job (e.g. the Speed Lever or the VAR tyre lever). When fitting a tyre, put one side of the tyre on the rim and ensure the bead of the tyre is seated correctly on the rim (this bead will be made of either steel - and therefore rigid, or of Kevlar and therefore flexible). Put a little air in the inner tube (enough to give it shape), and starting with the inner tube valve in the valve hole in the rim, fit the inner tube in the tyre ensuring it is positioned over the well of the rim. The next step is to fit the other side of the tyre. Push the valve up into the tyre valve and pull the tyre over the edge of the rim. Let all of the air out (ensuring the tube stays within the tyre) and working outwards from the valve, start to pull the tyre over the rim. This will get harder to do as you go round the tyre and the last quarter may be quite difficult to get on (some tyre/rim combinations are harder than others). If this is the case, make sure all the air is out of the tube and beginning at the valve again, start stretching the tyre to the remaining portion. Also ensure the tube is not caught between the bead of the tyre and the rim. If it still won't go on, this is where the above tyre levers come in to their own. If you don't have one of these, then a standard tyre lever can be used to fit the last bit. Slip the lever between the tyre and rim and start to ease the tyre on - but DO NOT bring the lever past 90 degrees to the rim or you will pinch the inner tube!!!
If you are using tubs, then the Park Tools website has a good 'how to' section on this (and many other topics for that matter).
It's a good idea to check your tyres every so often, checking for excess wear and also to remove any pieces of glass or flint before they work their way through the tread causing punctures.
Most pedals sold nowadays are of the 'clipless' variety which have a quick release mechanism similar to a ski binding. Riders push their
foot down on the pedal to engage the locking mechanism with a shoe plate (or cleat) attached to the bottom of the cycling shoe. A simple twist of the heel releases the shoe from the pedal.The advantage of these clipless systems over the old toe clips and straps is your feet invariably come out of teh pedals in the events of a crash (helping to prevent further injury), and they are more comfortable and warmer as there are no straps holding your feet into the pedal and restricting circulation. Some riders (particularly track riders) still prefer toe clips and straps however for the added security when performing fast starts and sprints.
The first of these clipless systems were made by Look in the early 80's, followed by Time and then a number of other, less popular makes. Both Look and Time are suitable for road riding and both allow a degree of 'float' - a certain amount of twisting before the shoe plate disengages from the pedal. This 'float' helps to prevent knee problems by allowing the foot to turn.
Most racing shoes sold will be compatible with the 3 point fixing used by Look and a nuber of other systems, however Time will require an adapter if you are using Time shoes (Time shoes will also require an adapter if you are using any other pedals but Time).
In 1990, Shimano brought out their SPD (Shimano Pedalling Dynamics) mountain bike pedals. These are double sided for easy entry (i.e. they have a quick release mechanism on both sides of the pedal) and the shoe plate is recessed into the sole of the shoes. They have since brought out single sided road versions and road racing shoes. These pedals are also suitable for touring due to the recessed shoe plate which allows you to walk normally. Please note however that there are now other makes of pedal that call themselves 'SPD' (eg Ritchey, Wellgo, and VP) but the shoe plates may not be compatible with Shimano or other makes. If you are going to buy these pedals, we suggest keeping to one make for all your bikes.
The use of specific cycling clothing is not essential, however it does make life more comfortable, especially in winter.
The first items of clothing to buy would be cycling shorts, shoes and crash hat.
Proper cycling shorts (rather than so called 'cycling' shorts available in sports shops) have an insert in the crotch area. This is usually padded and has flat seams to aid comfort. This insert used to be made from chamois leather although most are now from man made materials, however they are still referred to as the 'chamois'. It is best to go to a cycle shop to obtain these. No underwear is worn under cycling shorts as they have seams which negate
the benefits of the chamois. Because the chamois is next to the skin, it should be kept scrupulously clean to avoid any infections. Shorts do tend to ride down so it is worth purchasing a pair of clip on braces to hold them up, or you can obtain shorts that have straps that go over your shoulders called bib-shorts.
Cycling shoes have a stiff sole that aid the rider when pulling up on the pedal and do not transmit pressure from the pedal to the riders feet. Cycling shoes usually have the facility to attach shoe plates which
lock on to the pedal. Do NOT use cycling shoes designed for the road however unless you are using toe clips and straps, or clipless pedals, as the soles of these shoes are made from plastic and will slip off the pedals very easily. Mountain bike shoes tend to have an aggressive knobbly sole and are suitable for ordinary pedals or specific mountain bike pedals (see SPD pedals). Most of the
modern shoes are velcro or buckle fastened, but if you are using shoes with laces (or trainers), ensure that the laces on the right foot are short or tucked into the shoe as they can become entangled in the chain and chainring when pedalling.
Riding without a crash helmet is not illegal but we would strongly recommend its use. Most serious injuries to cyclists are head injuries and it makes sense to try and avoid these if at all possible, although no crash helmet can give 100% protection. When choosing a crash hat , the most important criteria is the fit. It should be a snug fit with no excessive twisting movement
allowed. Most hats have pads supplied to tailor the fit exactly. Look for helmets that comply with the usual safety standards uch as BSI, Snell, ANSI etc. Good makes to look out for include Giro, Bell, Specialized and Met. Generally speaking, the more money you spend on a helmet,the more ventilation it will have which is an important consideration for summer riding and racing. If you intend
to race, please note that an approved helmet iscompulsory for all BC and BCCA events, although they are optional for CTT time trials. If you do hit your head during a crash, you should replace the helmet immediately, even if it does not look damaged. They are designed to absorb the impact and once they have done so they will be weakened.
For winter riding, ensure that you have sufficient clothing as you will suffer from a higher wind chill than when you are walking or jogging. Wear gloves and a hat (if you are not wearing a helmet). A headband
will keep your ears warm if you are wearing a helmet. To keep your feet warm and dry, a pair of overshoes will help. Wear cycling bottoms (or track suit bottoms that are not too flared in the leg) to keep legs, and especially your knees, warm. Remember that plenty of thin layers will keep you warmer than one or two thick layers as they trap air between them and you can regulate your
temperature more accurately by taking off or adding thin layers. Try to include a 'thermal' base layer next to your skin that will wick away the perspiration and avoid that 'clammy' feeling.
Bright clothing will help to get you noticed, especially in poor light. Fluorescent coloured tops are especially good around dusk. For nightime riding, add clothes that have reflective or Scotchlite
strips. You can purchase these to sew on to clothes or you can buy reflective 'Sam Brown' belts.
Purchase a good quality waterproof as you can never depend on the British weather! Ideally this would be one of the breathable fabrics such as Goretex, however they can be expensive!
Fit mudguards to your bike if you are riding on the roads. This is for your comfort and the comfort of the riders behind you. The spray from the wheels will make your feet and back, as well the riders behind - cold, wet and dirty if you do not have
them.
Most cycling tops have two or three pockets on the back that enable you to carry food and other essentials. This is especially useful if you are doing longer races.
If you do intend to race, please note that you must wear the club design in all events under BC jurisdiction. For open time trials, you can wear club clothing or any top that does not have advertising or company logos other than the registered sponsors of the club. This rule does not apply to club only events. You may wish to consider purchasing a skinsuit for shorter time trials, road races, and track events. This is a one piece combined top and shorts that helps to reduce wind resistance and are more comfortable than separate items. In any bunched race, you should always wear a T-shirt under your outer racing top because in the event of a crash, the two tops will slide against each other, helping to reduce cuts and abrasions. For the same reason you should also wear gloves or (track) mitts.
Before setting out on a ride, you should make sure that you have eaten enough food for the distance you will be travelling; or that you
take sufficient food with you. If you are going to be racing, then this should be eaten with sufficient time beforehand to allow it to digest (say 1-2 hours). If a rider has pushed himself too far without eating enough to replace the energy used he can get what is known as the Bonk or the Hunger Knock. This is where the rider's blood sugar levels have fallen too low which can bring on dizziness and the shakes. When you have got to this state it will take a long time to recover so it is best to slow down (you won't have much choice!) and have something to eat, although it is better to try and eat something before you get to this state. A chocolate bar may be used as a
'get you home' assuming it is not too far but this should be backed up with something more substantial, say an energy drink, fruit (eg bananas), bread pudding, etc.
Food that you take with you is known as Bonk food surprisingly enough and complex carbohydrates (such as fruit, pasta, rice potatoes, bread etc) are best. Try and avoid sugary foods which cause a surge in blood sugar levels and then a dramatic fall, leaving you worse off than before. Energy drinks are good as they also replenish fluid levels at the same time, however please choose with care.
As well as eating, you must also drink (even in the winter) to stop dehydration which can have similar effects to the
Bonk. Try and drink before you get thirsty as it may be too late by then. Tests have shown that a loss of body fluids of little as 2% can cause a 20% loss in cycling performance! This is especially critical when racing and in any events lasting over an hour (or when it is very hot), you should carry a bottle with you. Recommended drinks are Maxim, Isostar, Gatorade, Hi Five and PSP amongst others which can be bought in powder form in large quantities (which is much cheaper). Some of these drinks are purely glucose polymers (i.e. they only supply energy) whereas others are 'isotonic'. Isotonic drinks include minerals and salts which match those of body fluids to replace those lost through sweating. This is helpful in avoiding cramp in hot weather.
Avoid most of the commercial 'energy' drinks in cans unless they are made by those manufacturers listed above as they consist mainly of sugar and have the same effect as sugary foods.
Remember try to eat and drink little but often.
Getting the correct position on the bike makes for a more comfortable ride. If you do not choose the Bioracer option described in a previous section, then the following paragraphs will give you a guide.
Saddle height is set by putting your heel (in cycling shoes) on the pedal and with the crank at its lowest point there should be a slight bend at the knee. In this position you should be able to pedal with your heels without rolling about on the saddle. If you are using shoes which have extra thick soles, that you may have to raise the saddle slightly to compensate.
Next set the correct foot position on the pedal. You should always pedal with the ball of your foot over the pedal spindle. This is where toe clips or clipless pedals help as they place the foot in the correct position when pedalling. Adjust the shoes plates forwards or backwards until your foot is in the correct position.
The Lateral position (forwards or backwards) of the saddle should be adjusted next. With the cranks set horizontally and your foot on the pedals in the correct position, a plumb line hanging from just behind the kneecap (i.e. at the pivot point of the knee) should hang vertically through the pedal spindle. Adjust the saddle forward or backwards until this happens. Get someone to help you with this.
The saddle should be horizontal for general riding, however for time trials when the position tends to be lower, you may wish to tilt the nose of the saddle down slightly to give a more comfortable ride.
This is often a case of trial and error before settling on a final position and a lot depends on the riders flexibility and the type of
riding they will be doing than on any hard and fast rules.
Handlebars should in general be the same width as the riders shoulders.
To approximate stem length, place the back of the elbow against the point of the saddle and, with the middle finger resting on top of the stem, there should be a gap of 1-2 inches between the end of the finger and the centre of the handlebars. For road riders, the top of the stem is normally set about 1-2 inches below the level of the top of the saddle. When riding with your hands on the brake hoods, look downwards and , if you cannot see the centre of the hub of your front wheel, then the stem length is about correct.
If you are unused to toe clips/straps or clipless pedals, practise getting your feet into the pedals. Do this in a quiet area away from traffic. This will help to avoid any potentially dangerous wobbles when starting off in traffic or at the start of a road race.
Again if you have not used toe clips/straps or clipless pedals, practise taking your feet out of the pedals in a quiet area traffic
free. It is instinctive to lift the foot off the pedal and when you are not used to the twisting action required for clipless pedals, it can cause a momentary panic and you may topple over. It is best to do this in a traffic free environment rather than at a set of traffic lights.
When stopping, apply the back brake slightly before the front and try to apply an even an equal pressure to both brakes.
A lot of the riding you will do will be in the company of others so it is important to learn how to do this. Sitting behind the rider in front (slipstreaming) will save you energy. With practise you will be able to stay 6-8 inches (or closer) behind. Make sure that your front wheel does not overlap the back wheel of the rider ahead of you. Avoid sharp braking or sudden movements such as getting out of the saddle as this has the effect of throwing the bike backwards which can be dangerous to the rider behind. Look out for obstacles or pot holes in the road and point these out to the riders behind.
Cornering is something you should practise, especially if you intend to race.
Try to follow an experienced rider and watch the line they take. Fix your line, go in at the right speed and accelerate out of the corner. Brake before the corner - not on it. Once you have your line, try to look at where you want to go rather than at the nearside kerb, because in missing the latter, you will probably find that your bike is not going where you want it to go. This may then entail a sudden change in direction with the consequent danger of a crash. Transfer your weight to the outside pedal, which in lowering your centre of gravity will give maximum tyre adhesion. This is particularly important when descending where you must also be alert to the need to take the correct line for the next corner whilst already coping with one.

Two riders descending on a cobbled hairpin bend during 1998 Amstel Gold. Note the racing line - starting wide, clipping the apex and then going wide again.
When cornering, try to avoid man-hole covers, drains, studs, road markings, black tar strips, leaves etc. especially in the wet as these all become very slippery. Also watch for the tell tale signs of oil spillage and black ice.
There are two climbing styles. One is sitting in the saddle with your hands on the top of the handlebars and sitting well back on the
saddle. This is suited to long shallower climbs. Try to keep an even pedalling rhythm in the correct gear. Too big a gear will cause back ache and knee problems, too small will cause breathlessness.
The other method is out of the saddle with the hands on the brake hoods. This is known as 'honking'. This is more suited to the shorter, steeper hills and may be tackled on a higher gear.
Keeping your tyres pumped up to the correct pressure will reduce rolling resistance and help to avoid 'impact' punctures (characterised by two slits either side of the inner tube), although letting a little air out the tyre will help adhesion on wet roads.
Keep your chain well lubricated as this will stop rusting, reduce wear, and reduce friction.
Padlock your bike when leaving it unattended.
If you have any further questions then do please ask someone from the club - they'll be more than happy to help. For more web based information then Sheldon Brown is a mine of useful information. Still stuck, then try some of the forums - see links below.
This glossary has been produced to help you to understand the large number of cycling terms and abbreviations that may be used in general cycling conversation.
| Governing Bodies and Associations | |
| C.T.T. | Cycling Time Trials. Formerly the R.T.T.C. or Road Time Trials Council:- The National Governing Body for cycling road time trials.They produce a handbook each year listing all of the open time trials in the country It is split into regions with the club being a member of the London East region. The London East produces a local handbook which includes all of the local club events. |
| B.C. | British Cycling or the British Cycling Federation (B.C.F.):- The National Governing Body for Road Races, Track Racing, Mountain Biking, BMX, and Roller Racing. It is responsible for the selection of the national teams when competing abroad and is the recognised governing body for cycle sport by the International Olympic Committee and the U.C.I.Membership of the BCF also entitles you to free 3rd Party insurance cover and legal assistance in the event of any accidents happening whilst riding your bike. BC is split into regions of which the club is a member of the Eastern Region. |
| C.T.C. | Cyclists Touring Club:- A National touring club. Membership of the CTC also entitles you to free 3rd Party insurance cover and legal assistance in the event of any accidents happening whilst riding your bike. |
| U.C.I. | Union Cycliste Internationale:- The international governing body of the sport. |
| E.C.C.A. | Eastern Counties Cycling Association (the 'Counties'):- An association of approximately 90 clubs in Essex, Herts, Cambridgeshire and Kent. The ECCA promote a number of events each year, including the Eastern Counties Festival (the 'Festival Weekend'). This is held over the May bank holiday and includes time trials, road races, and a map reading competition. |
| E.R.R.L. | Eastern Road Race League:- Formerly the Essex Road Race League. An association of clubs in the Eastern Region formed to promote road races on the open roads (as opposed to closed circuits). Riders from member clubs have first priority over non-member clubs and the league is currently restricted to 1st, 2nd, 3rd, 4th and Junior category riders. Also has its own forum. |
| L.V.R.C. | League of Veteran Racing Cyclists. "The League of Veteran Racing Cyclists provides racing for cyclists who are veterans, not for bikes that are veterans. To be eligible to join you must be 40 years of age or more; the League is open equally to male and female bike racers. The UCI, the international governing body, holds that Masters racing is for ages 30 and over and categorise masters racing from that age, but we are strictly for 40+ Veterans." |
| W.C.R.A. | Women's Cycle Racing Association:- An association formed to promote women's cycling in all forms. |
| 32nd Assoc. | An association of clubs formed to promote combined club events on the 'E1' course near Stansted. The start of these courses was traditionally the 32nd milestone from London, hence the name. Most of the member clubs have 'huts' in the area. |
| Eastway Supporters League | Formed to promote the running of events at the Eastway Cycle Circuit in Stratford. They promote the weekly Eastway Thursday League series of road races. |
| T.L.I. | The League International:- "The League International was founded and funded in late 1982 by Peter Duker and Roy Cottingham, they affiliated to the International Cycling Federation ( ICF )with the aim of bringing age related racing as practised on the Continent to Britain. The ICF is known in Europe as the "Free Federations" i.e. free of the UCI." |
| Veloriders | www.veloriders.co.uk:- Internet forum that has many current and ex National and World Champions registered amongst it users. Also includes one current World Masters champion with a penchant for cheese, sheds, keeping horses in the loft and any advice will cost you 5 grand; and a certain ex Cycling Weekly journalist with a Coronation Street / soaps fetish. Can be very informative but irreverent and funny at the same time as well as harsh on 'newbies'. Enter at your own risk but keep a sense of humour!!! |
| London Cycle Sport | www.londoncyclesport.com:- Website that gives news and results in and around London. Also has a forum. |
| Timetrialling Forum | www.timetriallingforum.co.uk:- Timetrialling specific forum. Also has a useful FAQ section |
| General Cycling Terms | |
| the Bonk | or the Hunger Knock. When a rider has pushed himself too far without eating enough to replace the energy used. The riders blood sugar levels have fallen too low which can bring on dizziness and the shakes. |
| Bonk food | Food to avoid the bonk (see above). |
| the Break | A rider or group of riders who have broken away from the bunch and are now in the lead. |
| the Bunch | The main group of riders in a race. |
| Category | Road riders (and track riders) are split into categories depending on how many points (i.e. placings) they have gained. The top category is Elite which includes the professional riders, then 1st cat. down to 4th cat. In mountain biking, the categories are Elite, Expert, Sport and Fun. |
| Commissaire | The official in charge of a road race. |
| Criterium | A road race held over many laps of a short course, usually around a town centre. |
| Eastway | A purpose built one mile cycle circuit at Temple Mills near Stratford |
| Espoirs | or under 23 years old. This category was introduced by the UCI after the distinction between professional and amateur was abolished to ease the transition from Junior level to Senior level. |
| Junior | or 16 - 18 year old. A rider will remain a Junior for all of the year that they turn 18. |
| Juvenile | or under 16. A rider will remain a Juvenile for all of the year that they turn 16. Juveniles are now split into U16, U14, and U12 |
| Master | A rider who is 30 and over. |
| Neutralised zone | The part of the course from the race headquarters or start of a race, until the circuit proper. The riders are led through this zone by a lead car as this may be through built up areas that would be dangerous to race through. |
| the Peloton | French term that also means the main group of riders in a race. |
| Prime | (pronounced 'preem') An intermediate prize (usually cash) during a race. |
| Veteran | A rider who is 40 and over. |
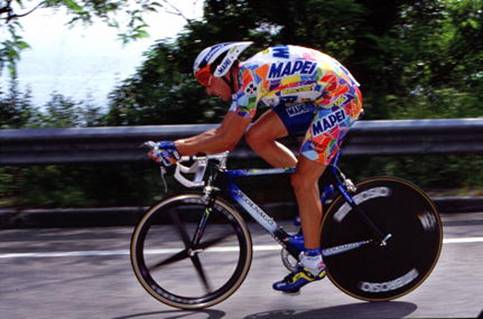
A professional rider time trialling during the 1998 Giro d'Italia. Note the use of a low-profile frame with a small front wheel and tri-bars to give an aerodynamic position, a 'Spinergy' front aero wheel, a rear disc wheel and the aerodynamic crash hat. He is also wearing a skinsuit and using Look 'clipless' pedals.
| Parts of the bike | (Please note that only the less common terms are listed here.) |
| 650c's | 650c is the size of wheel that is the metric equivalent of 26" wheels |
| 700c's | 700c is the standard road size wheel and has more or less replaced the old 27" wheel. The width of the rim can vary from 20mm to 35mm. |
| Aheadset | See 'Headset'. |
| Aero spoke wheel | A wheel that has 3 or more carbon fibre, or small number of flattened steel spokes and a deep 'V' section rim. |
| Bottom Bracket | See chainset |
| Cassette | Sets of sprockets that are mounted on a cassette hub. |
| Cassette Hub | The rear hub that now incorporates the freewheel mechanism. The body of the hub is splined to allow easy fixing and removal of the cassette. |
| Chainrings | See chainset |
| Chainset | The arms (cranks) that the pedals are screwed into. The right hand crank also has the chainring(s) bolted onto it and it is this that drives the chain. The cranks are connected via the bottom bracket. |
| Clipless pedals | These have more or less replaced toe clips and straps. The pedal has a quick release mechanism similar to a ski binding. Riders push their foot down on the pedal to engage the locking mechanism with a shoe plate (or cleat) attached to the bottom of the cycling shoe. A simple twist of the heel releases the shoe from the pedal. |
| Cranks | See chainset |
| Disk Wheel | A wheel that has no spokes and is made from two circular sheets of carbon fibre. |
| Dropouts | The part of the frame where the wheel axle slots into. There will be a dropout on each side on the front forks and each side of the rear forks. The right hand rear dropout will also incorporate the 'hanger' into which the rear derailleur is bolted. |
| Freewheel | The set of sprockets that screws onto the rear hub. It incorporates the mechanism that allows riders to 'freewheel' hence the name. Has tended to be replaced by the Cassette Hub and Cassette sprockets. |
| Front derailleur | or Front Mech(anism) The gear mechanism that moves the chain between the chainrings. |
| Headset |
The set of ball bearings at either end of the head tube or steering column. Traditional headsets are adjusted using two large locking nuts at top of the head tube and are only for use with 'quill' type handlebar stems. These are gradually being replaced by Aheadset type headsets. These have a threadless steering column that rises above the headset. The handlebar stem is clamped on to the stem to prevent it from loosening with the adjustment of the bearings applied useing 'pre-load' (by various methods) before the handlebar stem is tightened. |
| HP's | High Pressure or 'clincher' rims. This type of rim has a 'U' section for tyres that have a separate inner tube. |
| Indexing | or 'click shift' gear changing. |
| Quick Release | or Skewer A cam action lever that undoes a wheel for a quick wheel change. |
| Rear derailleur | or Rear Mech(anism) The gear mechanism that moves the chain across the sprockets on the back wheel. The rear mech. has two 'jockey' wheels to guide the chain. |
| Sprints | The type of rim used for tubular tyres. The tyre is glued on to the bed of the rim and is the favoured rim for racing. |
| Tri bars | Handlebar extensions that project forward, with arm rest for the rider. They allow a very aerodynamic position when time trialling. |
| Tri Spoke wheel | A wheel that has 3 large aerodynamic carbon fibre spokes instead and a deep 'V' section rim. |
| Toe Clips & Straps | A 'U' shaped attachment to the front of a pedal. With the aid of toe straps, they keep the foot secured in the correct position on the pedal and aid the rider in pulling up the pedal as well as pushing. |
| Tubular tyres | or 'tubs' These tyres may be made of cotton or silk with the tread glued to the outside, and the inner tube is stitched inside. The tyre is glued on to the rim (see 'Sprints') using special glue or 'tub tape' (a type of double side sticky tape) and they can be pumped up to very high pressures. |
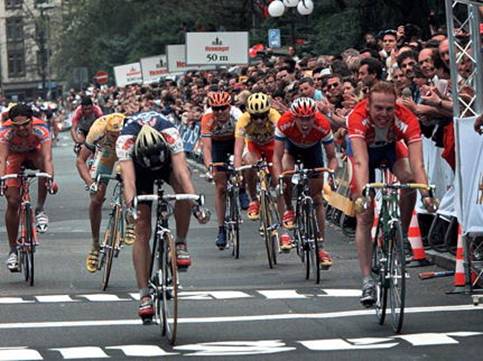
Fabio Baldato wins the 1998 Grand Prix Frankfurt road race.
| Types of racing | ||
| Time Trials | A race where riders compete alone against the clock. Riders set off at 1 minute intervals with the winner being the rider with the fastest time. Some time trials may have a handicap prize as well as a scratch prize. The handicap will be in the form of minutes and seconds which is deducted from your finishing time. The handicap is calculated from your previous personal best performance at the distance. Some events are open to tandems. | |
| Team Time Trials | Are similar to time trials except that teams of 2, 3, or 4 riders may compete. The winners are the team with the fastest time. | |
| Roller Racing | A set of rollers consists of 3 rollers (2 at the back and 1 at the front) upon which a bike can be ridden in much the same fashion as a treadmill or rolling road. Sets of 4 rollers can be connected to a large 'clock' with a pointer for each roller indicating how far they have travelled. In this way, riders can race each other. Roller racing tends to be an indoor winter activity and is fast and furious with equivalent speeds of around 60 mph due to low friction and no wind resistance. | |
| Cyclo Cross | Modified road bikes compete on a cross country course although most are open to mountain bikes. Races tend to last up to an hour and occur in the winter. Competitors may change bikes during the event when they get too muddy. | |
| Mountain Bikes: | ||
| Cross country | races are similar to cyclo cross events but are generally more of a summer activity (although there is large overlap between the two). Competitors may not receive any outside help or change bikes, wheels etc. and therefore has to fix any problems that may occur by themselves. | |
| Downhill | races are to see who can get down a mountain in the quickest possible time. | |
| Road Races | Riders start in a group (the 'bunch') and the winner is the first over the finishing line. Some road races may be handicapped; the slower riders start small groups before the faster riders who have to catch them to win. | |
| Track Races | Track racing consists of many different events which are listed below. They are held on banked hard tracks ('velodromes' which can be made of wood, concrete or asphalt, indoors or outdoors) or on grass tracks. Track bikes have a single 'fixed' gear (i.e. you cannot stop pedalling) and do not have brakes. Some events (especially on grass) may be handicapped. | |
| Sprint | Can be held over 1,2, 3 or 4 laps of the track depending on the track size (up to 1,000m in total), usually between 2 to 4 riders. The winner is the first over the line. Racing can be very tactical but usually ends with a fast and furious finish. Some events are open to tandems. | |
| Pursuit | Individual riders start on opposite sides of the track and the winner is the rider who completes the distance in the quickest time, or catches their opponent. Women compete over 3km and men over 4km. | |
| Team Pursuit | As for the pursuit but teams of four riders compete against each other. | |
| Time Trial | Also known as the 'Kilo'. Riders compete individually over 1km and the winner is the rider with the quickest time. Although probably the shortest event in time, it is also the most painful! | |
| Team Sprint | Teams of 3 riders ride a 3 lap race against the clock, with the first rider dropping out after 1 lap, the second rider a lap later, and the third rider completing the distance. Only the third rider completes all three laps. | |
| Points Race | A bunch of riders sprint for points at set intervals during the race (say every 5 laps) and the winner is the rider with the most number of points at the end of the race. | |
| Scratch race | A straight distance event with the winner being the first over the finishing line. | |
| Devil | or Devil take the Hindmost. The last rider in the bunch over the line each lap is eliminated until 3 remain, who then sprint it out between them. | |
